Campaigns
This article will provide you an overview of the Campaigns section and it's functionality:
The Campaigns are made up of lists that contain leads. Which you can then assign agents utilizing the Matrix's predictive dialer to call these leads.
You can have multiple leads, lists and Campaigns, as well as agents can be assigned to multiple Campaigns.
You can have multiple leads, lists and Campaigns, as well as agents can be assigned to multiple Campaigns.
Campaign settings and options overview
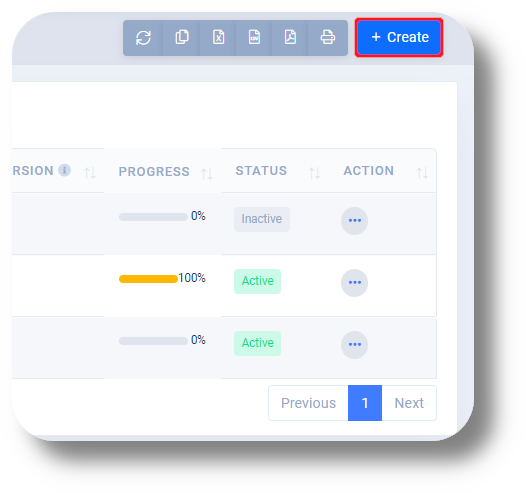
1. Navigate to the campaigns tab by selecting "Campaigns":
2. You can use the "Search field" to locate a specific campaign in your list quickly, if you have many campaigns:
3. You can also filter campaigns as "Active" or "Inactive" using the designated field:
4. You can refresh and update the campaign information by clicking the 'Update' button:
5. Copy basic information for all campaigns by clicking 'Copy':
6. Generate an Excel report with basic information by clicking 'Excel':
7. Generate a CSV report with basic information by clicking 'CSV':
8. Generate a PDF report with basic information by clicking 'PDF':
9. Print a report with basic information by clicking 'Print':
10. Access various actions, such as edit, duplicate, delete, or stop a campaign, and logout an agent, by clicking the 'Action' button:
How to create a Campaign
11. To create a new campaign, click "Create":
General
12. Specify a campaign name:
You can set your campaign status to active from here under the Campaign status, or alternatively set it to active later on.
13. Select how calls will be distributed among agents from the 'Agent Selecting' drop-down menu:
Longest Wait time: This will distribute the calls to the agent that has been waiting the longest
Random: This will distribute the calls randomly between all active agents
Oldest Call Start: The calls will be distributed accordingly to which ever agent first started a call
Oldest Call Finish: The calls will be distributed accordingly to which ever agent completed a call last
Fewest Calls: The calls will be distributed accordingly to which ever agent had made the fewest calls
Country Rank: The calls will be distributed accordingly to the Country Rank specified under each lead. NOTE: This is set individually from each lead.
14. Click the 'Dial Method' drop-down menu to configure your dialing method:
 Predictive - The Dialing speed will be multiplied by the available agents.
Example Predictive: If you have 10 available agents and the Max Dial level is 2 (10 x 2 = 20 leads will be called simultaneously).
Predictive - The Dialing speed will be multiplied by the available agents.
Example Predictive: If you have 10 available agents and the Max Dial level is 2 (10 x 2 = 20 leads will be called simultaneously). Hard Predictive with limitations - The dial speed will be multiplied by the Max Dial Level, it will be controlled via the Maximum Drop Ratio % and it will be monitored by the system. If the Maximum Drop Ration % number is reached, the system automatically will lower the Max Dial Level to 1.
Average Predictive with limitations - The dial speed will be multiplied by the Max Dial Level, it will be controlled via the Maximum Drop Ratio % and it will be monitored by the system. If the Maximum Drop Ration % number is reached, the system automatically will lower the Max Dial Level to an average that the system algorithm considers to be appropriate
15. Set up the dialing speed with 'Max Dial Level':
16. Choose how the Matrix will call leads with 'Leads Ordering':
RANDOM: Calls leads on a random basis
From First Lead Insert: Calls leads in order from the first uploaded lead
From Last Lead Insert: Call leads in order form the last uploaded lead
From oldest Lead Called: Calls leads in order from the oldest lead called
From Newest Lead Called: Calls leads in order from the newest/last lead called
From Lowest RANK: Calls leads in order from the lowest Rank (Ranks are set in each lead)
From highest RANK: Calls leads in order from the highest Rank (Ranks are set in each lead)
From Western Timezones and Works East: Calls leads accordingly the timezones
17. Decide whether the third person invited to the call will see the 'Campaign DID' or the 'Customer number' with 'Three Way Caller ID' option:
18. Select a pre-created sales script for agents in the campaign with 'Sale Script':
19. Create a new sales script by clicking the "edit" button:
20. Choose or create scripts from the 'Script' drop-down menu:
21. Name your script by clicking 'Script Name':
22. Click 'Variable' to choose a variable to use in your script:
The Variables let you automatically insert the lead details (phone, names ...) and automatically will be filled in with the lead info. Compose the body in the text editor.
Use variables and the text format options to your heart's content.
23. Write the content of your script in the provided text area next to "Content" and click "Save changes" to save your new script:
24. Specify who/which teams has access and is apart of this Campaign from the "Group Access" option:
25. Choose the usable lead statuses from the "Lead Status":
26. Specify the "Call Times":
Leads will receive calls from this campaign only within these hours (Matrix timezone doesn't matter, only lead timezone is considered for this setting)
27. To create Call Time Rules click the "edit" button:
28. From the new window you will be able to specify the call time rules and save them so you can select them from the drop down menu in the "Call Times" section:
Leads
29. From the Leads section you can activate the option to automatically call a leads alternative phone (if you've specified one under the leads details/profile):
If during the auto-dialing the lead doesn't answer their main phone. You can enable this option to automatically call their alternative phone number.
You also have to specify which status would trigger this action. (You can select multiple statuses)
30. You can also enable the daily list reset, which ones a day will reset the leads with the specified status (you can select more than one):
Once a day, automatically resets leads with chosen statuses if there are no dialable leads left in a list and at least one agent is logged into the campaign.
For small campaigns (0>100% completion in 1-3 days) please make a lead recycle rule instead.
31. Specify the lead recycle rules:
You can also create your recycle rules from the edit button:
From the new window you will be able to specify the lead recycle rules as you require:
Agents
32. From the Agents tab you can specify the Custom fields that can be used under this Campaign:
You can create Custom Fields from the Settings>Custom Fields
33. Select which pause statuses can be used with this campaign:
You can create more Pause Statuses from the Settings>Statuses>Pause Statuses
34. You can also select and upload your own music on hold for the respective campaign:
Phone Numbers
35. Under the Phone Numbers section you can select the Caller ID Management:
The dialplan establishes the permitted Caller IDs dialed
Selecting Custom will allow you to edit the Caller ID Rules:
From the new window you can edit the Caller ID rules, which allows you to customize dial plans based on country code and area code:
You can add multiple rules
36. Select your Billing account if you have more than one:
37. Lastly select the Phone Numbers that should be used by this campaign to make calls and click "Save changes" to create your campaign:
Video guide:
Related Articles
How to Create a Campaign in Power Dialer
How to Create a Campaign in Power Dialer Campaigns define how outbound calls are distributed within the Power Dialer, who participates, which contacts are called, and how calls are handled. ? Note: Admin permissions are required to create and manage ...How to Create and Manage Campaign Scripts
How to Create and Manage Campaign Scripts Campaign Scripts help agents follow a consistent conversation during outbound calls. ?Useful Tip: Scripts can be reused across multiple campaigns. ? Note: Admin permissions are required to create and manage ...How to Create & Manage Call Wrap-Up Statuses
How to Create & Manage Call Wrap-Up Statuses Call Wrap-Up Statuses have a role of disposition statuses that define the outcome of a call. Agents select a Wrap-Up Status during Wrap-Up to categorize what happened during the call. This turns ...How to Monitor Campaign Activities
How to Monitor Campaign Activities Managers and Admins can monitor all outbound campaigns from a centralized dashboard. To access it, go to Campaigns → Campaigns. Campaign Dashboard The dashboard displays: Total campaigns Campaign status Total leads ...How to change the Disposition Time
In order to change the Disposition Time for the Disposition window please follow the steps below: 1. Navigate to Settings and then Roles & Permissions under the Organization section: 2. Click the edit button next to the respective profile you would ...